The operation of crown and bridge try-in requires the doctor’s superb operation and fine skills. china dental outsourcing will tell you the clinical inspection steps, problem performance and related clinical skills of crown and bridge try-in.
1 Evaluation of the restoration on the prototype before the crown and bridge try-in
Before the crown and bridge try-in, check the tightness of the crown and the replica. Through inspection, physicians can identify possible problems with the crown’s edge fit, esthetics, and occlusion.
In general, common problems can include too tight interproximal contact, small protrusions on the tissue surface of the casting, excessive extension of the crown margin, insufficient crown margin extension, damage to the die, etc.

1. The contact surface is too tight
It is generally caused by die positioning, inaccuracy or wear of the contact points of the collar.
Solution: When the crown is in place, check whether the die is displaced, and use the bite paper to determine the contact point that is too tight for grinding and polishing.
2. There are small protrusions on the organizational surface of the casting
It is usually caused by the appearance of air bubbles during embedding.
Solution: Grind off the small round drill.
3. The edges are too stretched
Can be caused by poor impression quality, poor die trimming, excess untrimmed wax or porcelain on the crown margin.
Solution: Trim and polish the crown axis, or consider returning the restoration to the lab for rework.
4. Not enough edge stretch
The reasons are poor impression quality, poor die trimming, inability to determine the finish line, etc.
Solution: Re-impression and restoration
5. Generation damage
The cause is damage to the finish line due to carelessness by the technician, or to wear the die when air bubbles on the casting are seated on the die.
Solution: Carefully examine the cause of the die damage, and if the restoration does not fit after removing air bubbles or small protrusions and trimming overly long edges, it should be returned to the laboratory for rework.

2 Try the restoration on the tooth
After inspection of the restoration on the prototype, the temporary restoration in the patient’s mouth should be taken out and the temporary cement remaining on the teeth should be completely removed, especially the cement remaining in the retention sulcus or in the gingival sulcus should be removed. .
Physicians can gradually determine the reasons for the failure of crown and bridge try-in through the following series of examinations:
- Make sure that there is no residual temporary adhesive or gingival tissue interference;
- Check and adjust the contact of the adjacent surfaces that are too tight, and check the model damage in the contact area at the same time;
- Check the obvious errors related to the production of the technicians, including the bubbles, nodules, die defects and edge defects of the castings, and use a bur to remove the bubbles and small nodules of the castings;
- For the edge that is too extended, it must be trimmed from the outside of the crown and cannot be trimmed from the inside of the crown;
- Where the crown cannot be seated, all imperfections need to be gently polished with a bur and then tried again.
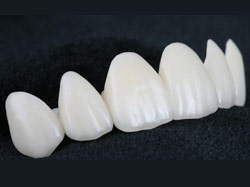
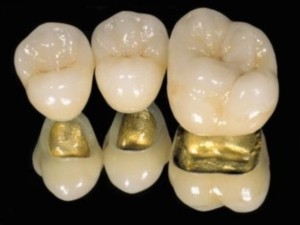
3 Final assessment of restoration seating from 4 aspects
The evaluation of the crown in place should be carried out from the four aspects of interproximal contact, aesthetics, edge closeness, and occlusion.
Interproximal Contact
Physicians use dental floss to check for interproximal contact, and a suitable interproximal contact is one that allows the floss to pass with little resistance.
If the contact is a little tight, a small amount of grinding and polishing can be performed on the contact area adjacent to the crown. At this time, you should be very careful. Improper operation may cause the contact area to become larger and open.
It is also helpful to check the fit of the jaw by using a thinner bite paper between the crowns (in the mouth or on the replica) before adjustment.
The contact area is rare, and once it occurs, the physician can improve it by sending the crown back to the laboratory to add porcelain and alloy solder to the proximal surface.
Untreated prostheses should never be inserted and cemented in the patient’s mouth, as this may cause food impaction.
Beautiful
Adjust the color and shape of the crown. It should be noted here that small adjustments should be made in order, and porcelain can be added to the metal layer if necessary.
If the color is too light, it can be improved by dyeing and sintering again.
In addition, the color of all-ceramic crowns and veneers can be fine-tuned with resin adhesives.
Before bonding, the patient should be asked to evaluate the restoration. If the patient cannot accept the color and shape of the crown, it is recommended to tell the patient directly.
When trying-in the crown and bridge, the physician must not risk the patient’s dissatisfaction by bonding, and finally dismantling the restoration, and then repeating all the previous manufacturing processes.
Convincing a patient to accept a restoration that is not satisfactory to him may be a temporary success, but leaves the potential for future disputes.
Edge Fit
Crown fit can range from very tight to open along the edge of the tooth, especially at edges that can only be probed.
Physicians adhere to high clinical standards during the procedure to prolong the life of the prosthesis.
Most of the clinical failure of crown and bridge try-in is closely related to the insufficient closeness of its edges. Poor margins can make the cement more accessible to saliva or moisture in the mouth and dissolve, leading to poor crown retention, marginal plaque buildup, and secondary caries.
A defective subgingival margin can affect gum health through local bacterial action.
Bite
The final step is an occlusal assessment, where the physician preferably removes the crown and selects several adjacent teeth. To serve as a reference for evaluation after the crown is repositioned, the thin bite paper at this time determines the amount of adjustment that needs to be made.